解读 Android TTS 语音合成播报

随着从事 Android 开发年限增加,负责的工作项目也从应用层开发逐步过渡到 Android Framework 层开发。虽然一开始就知道 Android 知识体系的庞大,但是当你逐渐从 Application 层向 Framework 层走的时候,你才发现之前懂得认知真是太少。之前更多打交道的 Activity 和 Fragment ,对于 Service 和 Broadcast 涉及的很少,更多注重的是界面的布局、动画、网络请求等,虽然走应用开发的话,后期会关注架构、性能优化、Hybrid等,但是逐渐接触 Framework 层相关模块时候,发现里面的知识点各种错综复杂,就好比讲讲今天分享的主题是 Android TTS

话不多说,先来张图,分享大纲如下:

大纲

之前受一篇文章启发,说的是如何讲解好一个技术点知识,可以分为两部分去介绍:外部应用维度和内部设计维度,基本从这两个角度出发,可以把一个技术点讲的透彻。同样,我把这种方式应用到写作中去。

外部应用维度

什么是 TTS

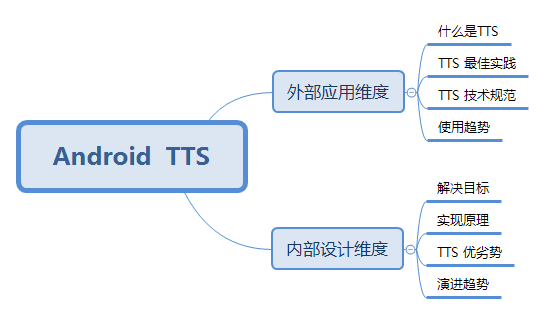
在 Android 中,TTS全称叫做 Text to Speech,从字面就能理解它解决的问题是什么,把文本转为语音服务,意思就是你输入一段文本信息,然后Android 系统可以把这段文字播报出来。这种应用场景目前比较多是在各种语音助手APP上,很多手机系统集成商内部都有内置文本转语音服务,可以读当前页面上的文本信息。同样,在一些阅读类APP上我们也能看到相关服务,打开微信读书,里面就直接可以把当前页面直接用语音方式播放出来,特别适合哪种不方便拿着手机屏幕阅读的场景。

TTS 技术规范

这里主要用到的是TextToSpeech类来完成,使用TextToSpeech的步骤如下:

创建TextToSpeech对象,创建时传入OnInitListener监听器监听示范创建成功。
设置TextToSpeech所使用语言国家选项,通过返回值判断TTS是否支持该语言、国家选项。
调用speak()或synthesizeToFile方法。
关闭TTS,回收资源。

XML文件

1
2
3
4
5
6
7
8
9
10
11
12
13
14
15
16
17
18
19
20
21
22
23
24
25
26
27
28
29
30
31
32
33
34
35
36
37
38
39
40
41
42
43
44
45
46
47
48
49
50
51
52
53
54
55
56
57
58
59
60
<?xml version="1.0" encoding="utf-8"?>
<RelativeLayout xmlns:android="http://schemas.android.com/apk/res/android"
xmlns:tools="http://schemas.android.com/tools"
android:layout_width="match_parent"
android:layout_height="match_parent">

<ScrollView
android:layout_width="match_parent"
android:layout_height="match_parent">

<LinearLayout
android:layout_width="match_parent"
android:layout_height="match_parent"
android:orientation="vertical">

<EditText
android:id="@+id/edit_text1"
android:layout_width="match_parent"
android:layout_height="wrap_content"
android:text="杭州自秦朝设县治以来已有2200多年的历史,曾是吴越国和南宋的都城。因风景秀丽,素有“人间天堂”的美誉。杭州得益于京杭运河和通商口岸的便利,以及自身发达的丝绸和粮食产业,历史上曾是重要的商业集散中心。" />

<Button
android:id="@+id/btn_tts1"
android:layout_width="150dp"
android:layout_height="60dp"
android:layout_marginTop="10dp"
android:text="TTS1" />

<EditText
android:id="@+id/edit_text2"
android:layout_width="match_parent"
android:layout_height="wrap_content"
android:text="伊利公开举报原创始人郑俊怀:多名高官充当保护伞 北京青年报 2018-10-24 12:01:46   10月24日上午,伊利公司在企业官方网站发出举报信,公开举报郑俊怀等人,声称郑俊怀索要巨额犯罪所得不成,动用最高检某原副检察长等人施压,长期造谣迫害伊利,多位省部级、厅局级领导均充当郑俊怀保护伞,人为抹掉2.4亿犯罪事实,运作假减刑,14年来无人敢处理。" />

<Button
android:id="@+id/btn_tts2"
android:layout_width="150dp"
android:layout_height="60dp"
android:layout_marginTop="10dp"
android:text="TTS2" />

<Button
android:id="@+id/btn_cycle"
android:layout_width="150dp"
android:layout_height="60dp"
android:layout_marginTop="10dp"
android:text="Cycle TTS" />

<Button
android:id="@+id/btn_second"
android:layout_width="150dp"
android:layout_height="60dp"
android:layout_marginTop="10dp"
android:text="Second TTS" />

</LinearLayout>

</ScrollView>
</RelativeLayout>

Activity文件

1
2
3
4
5
6
7
8
9
10
11
12
13
14
15
16
17
18
19
20
21
22
23
24
25
26
27
28
29
30
31
32
33
34
35
36
37
38
39
40
41
42
43
44
45
46
47
48
49
50
51
52
53
54
55
56
57
58
59
60
61
62
63
64
65
66
67
68
69
70
71
72
73
74
75
76
77
78
79
80
81
82
83
84
85
86
87
88
89
90
91
92
93
94
95
96
97
98
99
100
101
102
103
104
105
106
107
108
109
110
111
112
113
114
115
116
117
118
119
120
121
122
123
124
125
126
127
128
129
130
131
132
133
134
135
136
137
138
139
140
141
142
143
144
145
146
147
148
149
150
151
152
153
154
155
156
157
158
159
160
161
162
163
164
165
166
167
168
169
170
171
172
173
174
175
176
177
178
179
180
181
182
183
184
185
186
187
188
189
190
191
192
193
194
195
196
197
198
199
200
201
202
203
204
205
206
public class TtsMainActivity extends AppCompatActivity implements View.OnClickListener,TextToSpeech.OnInitListener {
private static final String TAG = TtsMainActivity.class.getSimpleName();
private static final int THREADNUM = 100; // 测试用的线程数目

private EditText mTestEt1;
private EditText mTestEt2;
private TextToSpeech mTTS; // TTS对象
private XKAudioPolicyManager mXKAudioPolicyManager;
private HashMap mParams = null;

@Override
protected void onCreate(Bundle savedInstanceState) {
super.onCreate(savedInstanceState);
setContentView(R.layout.activity_main);

mTestEt1 = (EditText) findViewById(R.id.edit_text1);
mTestEt2 = (EditText) findViewById(R.id.edit_text2);

findViewById(R.id.btn_tts1).setOnClickListener(this);
findViewById(R.id.btn_tts2).setOnClickListener(this);
findViewById(R.id.btn_cycle).setOnClickListener(this);
findViewById(R.id.btn_second).setOnClickListener(this);
init();
}

private void init(){
mTTS = new TextToSpeech(this.getApplicationContext(),this);
mXKAudioPolicyManager = XKAudioPolicyManager.getInstance(this.getApplication());
mParams = new HashMap();
mParams.put(TextToSpeech.Engine.KEY_PARAM_STREAM, "3"); //设置播放类型(音频流类型)
}

@Override
public void onInit(int status) {
if (status == TextToSpeech.SUCCESS) {
int result = mTTS.setLanguage(Locale.ENGLISH);
if (result == TextToSpeech.LANG_MISSING_DATA || result == TextToSpeech.LANG_NOT_SUPPORTED) {
Toast.makeText(this, "数据丢失或不支持", Toast.LENGTH_SHORT).show();
}
}
}

@Override
public void onClick(View v) {
int id = v.getId();
switch (id){
case R.id.btn_tts1:
TtsPlay1();
break;
case R.id.btn_tts2:
TtsPlay2();
break;
case R.id.btn_second:
TtsSecond();
break;
case R.id.btn_cycle:
TtsCycle();
break;
default:
break;
}
}

private void TtsPlay1(){
if (mTTS != null && !mTTS.isSpeaking() && mXKAudioPolicyManager.requestAudioSource()) {
//mTTS.setOnUtteranceProgressListener(new ttsPlayOne());
String text1 = mTestEt1.getText().toString();
Log.d(TAG, "TtsPlay1-----------播放文本内容:" + text1);
//朗读,注意这里三个参数的added in API level 4 四个参数的added in API level 21
mTTS.speak(text1, TextToSpeech.QUEUE_FLUSH, mParams);
}
}

private void TtsPlay2(){
if (mTTS != null && !mTTS.isSpeaking() && mXKAudioPolicyManager.requestAudioSource()) {
//mTTS.setOnUtteranceProgressListener(new ttsPlaySecond());
String text2 = mTestEt2.getText().toString();
Log.d(TAG, "TtsPlay2-----------播放文本内容:" + text2);
// 设置音调,值越大声音越尖(女生),值越小则变成男声,1.0是常规
mTTS.setPitch(0.8f);
//设定语速 ,默认1.0正常语速
mTTS.setSpeechRate(1f);
//朗读,注意这里三个参数的added in API level 4 四个参数的added in API level 21
mTTS.speak(text2, TextToSpeech.QUEUE_FLUSH, mParams);
}
}

private void TtsSecond(){
Intent intent = new Intent(TtsMainActivity.this,TtsSecondAcitivity.class);
startActivity(intent);
}

private void TtsCycle(){
long millis1 = System.currentTimeMillis();

for (int i = 0; i < THREADNUM; i++) {
Thread tempThread = new Thread(new MyRunnable(i, THREADNUM));
tempThread.setName("线程" + i);
tempThread.start();
}

long millis2 = System.currentTimeMillis();
Log.d(TAG, "循环测试发音耗费时间:" + (millis2 - millis1));
}

@Override
protected void onStart() {
super.onStart();
}

@Override
protected void onStop() {
super.onStop();
}

@Override
protected void onDestroy() {
super.onDestroy();
shutDown();
}

private void shutDown(){
if(mTTS != null){
mTTS.stop();
mTTS.shutdown();
}
if(mXKAudioPolicyManager != null){
mXKAudioPolicyManager.releaseAudioSource();
}
}

/**
* 自定义线程可执行处理
* */
class MyRunnable implements Runnable {
private int i; // 第几个线程
private int threadNum; // 总共创建了几个线程

public MyRunnable(int i, int threadNum) {
this.i = i;
this.threadNum = threadNum;
}

@Override
public void run() {
runOnUiThread(new Runnable() {
@Override
public void run() {
Log.d(TAG, "在主线程中执行index:" + i + ",线程总数:" + threadNum);
if(i % 2 == 0){
Log.d(TAG, "TtsPlay1 index:" + i);
TtsPlay1();
}
else{
Log.d(TAG, "TtsPlay2 index:" + i);
TtsPlay2();
}
try {
Thread.sleep(10000);
} catch (InterruptedException e) {
e.printStackTrace();
}
}
});

}

}


public class ttsPlayOne extends UtteranceProgressListener{

@Override
public void onStart(String utteranceId) {
Log.d(TAG, "ttsPlayOne-----------onStart");
}

@Override
public void onDone(String utteranceId) {
Log.d(TAG, "ttsPlayOne-----------onDone");
}

@Override
public void onError(String utteranceId) {
Log.d(TAG, "ttsPlayOne-----------onError");
}
}

public class ttsPlaySecond extends UtteranceProgressListener{

@Override
public void onStart(String utteranceId) {
Log.d(TAG, "ttsPlaySecond-----------onStart");
}

@Override
public void onDone(String utteranceId) {
Log.d(TAG, "ttsPlaySecond-----------onDone");
}

@Override
public void onError(String utteranceId) {
Log.d(TAG, "ttsPlaySecond-----------onError");
}
}
}

加上权限

1
2
<uses-permission android:name="android.permission.READ_EXTERNAL_STORAGE"></uses-permission>
<uses-permission android:name="android.permission.WRITE_EXTERNAL_STORAGE"></uses-permission>

TTS 最佳实践

由于目前我在公司负责开发的产品是属于语音助手类型,自然这类 TTS 发声的问题和坑日常见的比较多。常见的有如下几种类型:

  • 系统自带的 TTS 功能是不支持中文的,想要支持中文的话,需要借助第三方引擎,比如常见的科大讯飞、百度等。
  • 如果换成支持中文引擎的话,一旦输入的文本中有夹杂着英文,那么有时候第三方TTS引擎有时候就很不友好,有时候会把英文单词每个字母读出来,英文甚至是发音不了,这里就需要注意下引擎的测试。
  • 在设置 TTS 参数的时候,需要注意语速、音高、音调的上限值,有时候参数可能是0-100的范围,有时候有些参数是在0-10的范围,特别需要根据不同引擎参数的值类型去设定。

使用趋势

随着物联网的到来,IoT设备增多,那么对于类似语音助手相关应用也会增多,因为语音是一个很好的入口,现在逐步从显示到去显示的过程,很多智能设备有些是不需要屏幕的,只需要能识别语音和播放声音。因此,随着这类应用的增长,对于TTS 相关的API接口调用频率肯定也是加大,相信谷歌在这方面也会逐步在完善。

内部设计维度

从外部使用角度入手,基本是熟悉API接口和具体项目中应用碰到的问题,然后不断总结出来比较优化的实践方式。了解完外部角度切入,那么我们需要里面内部设计是怎么一回事,毕竟作为一个开发者,知道具体实现原理是一个基本功。

解决目标

Android TTS 目标就是解决文本转化为语音播报的过程。那它到底是怎么实现的呢,我们从TextToSpeech类的构造函数开始分析。

这里我们用Android 6.0版本源码分析为主,主要涉及的相关类和接口文件,在源码中的位置如下:

framework\base\core\java\android\speech\tts\TextToSpeech.java
framework\base/core\java/android\speech\tts\TextToSpeechService.java
external\svox\pico\src\com\svox\pico\PicoService.java
external\svox\pico\compat\src\com\android\tts\compat\CompatTtsService.java
external\svox\pico\compat\src\com\android\tts\compat\SynthProxy.java
external\svox\pico\compat\jni\com_android_tts_compat_SynthProxy.cpp
external\svox\pico\tts\com_svox_picottsengine.cpp

实现原理

初始化角度:先看TextToSpeech类,在使用时,一般TextToSpeech类要进行初始化,它的构造函数有三个,最后真正调用的构造函数代码如下:

1
2
3
4
5
6
7
8
9
10
11
12
13
14
15
16
17
18
19
20
/**
* Used by the framework to instantiate TextToSpeech objects with a supplied
* package name, instead of using {@link android.content.Context#getPackageName()}
*
* @hide
*/
public TextToSpeech(Context context, OnInitListener listener, String engine,
String packageName, boolean useFallback) {
mContext = context;
mInitListener = listener;
mRequestedEngine = engine;
mUseFallback = useFallback;

mEarcons = new HashMap<String, Uri>();
mUtterances = new HashMap<CharSequence, Uri>();
mUtteranceProgressListener = null;

mEnginesHelper = new TtsEngines(mContext);
initTts();
}

从构造函数可以看到,调用到initTts操作,我们看下initTts方法里是什么东东,代码如下:

1
2
3
4
5
6
7
8
9
10
11
12
13
14
15
16
17
18
19
20
21
22
23
24
25
26
27
28
29
30
31
32
33
34
35
36
37
38
39
40
41
42
43
44
45
46
47
48
private int initTts() {
// Step 1: Try connecting to the engine that was requested.
if (mRequestedEngine != null) {
if (mEnginesHelper.isEngineInstalled(mRequestedEngine)) {
if (connectToEngine(mRequestedEngine)) {
mCurrentEngine = mRequestedEngine;
return SUCCESS;
} else if (!mUseFallback) {
mCurrentEngine = null;
dispatchOnInit(ERROR);
return ERROR;
}
} else if (!mUseFallback) {
Log.i(TAG, "Requested engine not installed: " + mRequestedEngine);
mCurrentEngine = null;
dispatchOnInit(ERROR);
return ERROR;
}
}

// Step 2: Try connecting to the user's default engine.
final String defaultEngine = getDefaultEngine();
if (defaultEngine != null && !defaultEngine.equals(mRequestedEngine)) {
if (connectToEngine(defaultEngine)) {
mCurrentEngine = defaultEngine;
return SUCCESS;
}
}

// Step 3: Try connecting to the highest ranked engine in the
// system.
final String highestRanked = mEnginesHelper.getHighestRankedEngineName();
if (highestRanked != null && !highestRanked.equals(mRequestedEngine) &&
!highestRanked.equals(defaultEngine)) {
if (connectToEngine(highestRanked)) {
mCurrentEngine = highestRanked;
return SUCCESS;
}
}

// NOTE: The API currently does not allow the caller to query whether
// they are actually connected to any engine. This might fail for various
// reasons like if the user disables all her TTS engines.

mCurrentEngine = null;
dispatchOnInit(ERROR);
return ERROR;
}

这里比较有意思了,第一步先去连接用户请求的TTS引擎服务(这里可以让我们自定义TTS引擎,可以替换系统默认的引擎),如果没找到连接用户的TTS引擎,那么就去连接默认引擎,最后是连接高性能引擎,从代码可以看出高性能引擎优先级最高,默认引擎其次,connectToEngine方法代码如下:

1
2
3
4
5
6
7
8
9
10
11
12
13
14
private boolean connectToEngine(String engine) {
Connection connection = new Connection();
Intent intent = new Intent(Engine.INTENT_ACTION_TTS_SERVICE);
intent.setPackage(engine);
boolean bound = mContext.bindService(intent, connection, Context.BIND_AUTO_CREATE);
if (!bound) {
Log.e(TAG, "Failed to bind to " + engine);
return false;
} else {
Log.i(TAG, "Sucessfully bound to " + engine);
mConnectingServiceConnection = connection;
return true;
}
}

这里的Engine.INTENT_ACTION_TTS_SERVICE的值为”android.intent.action.TTS_SERVICE”;其连接到的服务为action,为”android.intent.action.TTS_SERVICE”的服务,在external\svox\pico目录中的AndroidManifest.xml文件可以发现:

1
2
3
4
5
6
7
8
<service android:name=".PicoService"
android:label="@string/app_name">
<intent-filter>
<action android:name="android.intent.action.TTS_SERVICE" />
<category android:name="android.intent.category.DEFAULT" />
</intent-filter>
<meta-data android:name="android.speech.tts" android:resource="@xml/tts_engine" />
</service>

系统自带的默认连接的服务叫做PicoService,其具体代码如下:其继承于CompatTtsService。

1
2
3
4
5
6
7
8
9
10
public class PicoService extends CompatTtsService {

private static final String TAG = "PicoService";

@Override
protected String getSoFilename() {
return "libttspico.so";
}

}

我们再来看看CompatTtsService这个类,这个类为抽象类,它的父类为TextToSpeechService,其有一个成员SynthProxy类,该类负责调用TTS的C++层代码。如图:

CompatTtsService代码

我们来看看CompatTtsService的onCreate()方法,该方法中主要对SynthProxy进行了初始化:

1
2
3
4
5
6
7
8
9
10
11
12
13
14
15
16
17
18
19
20
21
22
23
24
25
26
27
28
29
30
31
32
33
34
35
36
37
38
@Override
public void onCreate() {
if (DBG) Log.d(TAG, "onCreate()");

String soFilename = getSoFilename();

if (mNativeSynth != null) {
mNativeSynth.stopSync();
mNativeSynth.shutdown();
mNativeSynth = null;
}

// Load the engineConfig from the plugin if it has any special configuration
// to be loaded. By convention, if an engine wants the TTS framework to pass
// in any configuration, it must put it into its content provider which has the URI:
// content://<packageName>.providers.SettingsProvider
// That content provider must provide a Cursor which returns the String that
// is to be passed back to the native .so file for the plugin when getString(0) is
// called on it.
// Note that the TTS framework does not care what this String data is: it is something
// that comes from the engine plugin and is consumed only by the engine plugin itself.
String engineConfig = "";
Cursor c = getContentResolver().query(Uri.parse("content://" + getPackageName()
+ ".providers.SettingsProvider"), null, null, null, null);
if (c != null){
c.moveToFirst();
engineConfig = c.getString(0);
c.close();
}
mNativeSynth = new SynthProxy(soFilename, engineConfig);

// mNativeSynth is used by TextToSpeechService#onCreate so it must be set prior
// to that call.
// getContentResolver() is also moved prior to super.onCreate(), and it works
// because the super method don't sets a field or value that affects getContentResolver();
// (including the content resolver itself).
super.onCreate();
}

紧接着看看SynthProxy的构造函数都干了什么,我也不知道干了什么,但是里面有个静态代码块,其加载了ttscompat动态库,所以它肯定只是一个代理,实际功能由C++本地方法实现

1
2
3
4
5
6
7
8
9
10
11
12
13
/**
* Constructor; pass the location of the native TTS .so to use.
*/
public SynthProxy(String nativeSoLib, String engineConfig) {
boolean applyFilter = shouldApplyAudioFilter(nativeSoLib);
Log.v(TAG, "About to load "+ nativeSoLib + ", applyFilter=" + applyFilter);
mJniData = native_setup(nativeSoLib, engineConfig);
if (mJniData == 0) {
throw new RuntimeException("Failed to load " + nativeSoLib);
}
native_setLowShelf(applyFilter, PICO_FILTER_GAIN, PICO_FILTER_LOWSHELF_ATTENUATION,
PICO_FILTER_TRANSITION_FREQ, PICO_FILTER_SHELF_SLOPE);
}

我们可以看到,在构造函数中,调用了native_setup方法来初始化引擎,其实现在C++层(com_android_tts_compat_SynthProxy.cpp)。

nativeSetup代码

我们可以看到ngine->funcs->init(engine, __ttsSynthDoneCB, engConfigString);这句代码比较关键,这个init方法上面在com_svox_picottsengine.cpp中,如下:

1
2
3
4
5
6
7
8
9
10
11
12
13
14
15
16
17
18
19
20
21
22
23
24
25
26
27
28
29
30
31
32
33
34
35
36
37
38
39
40
41
42
43
44
45
46
47
/* Google Engine API function implementations */

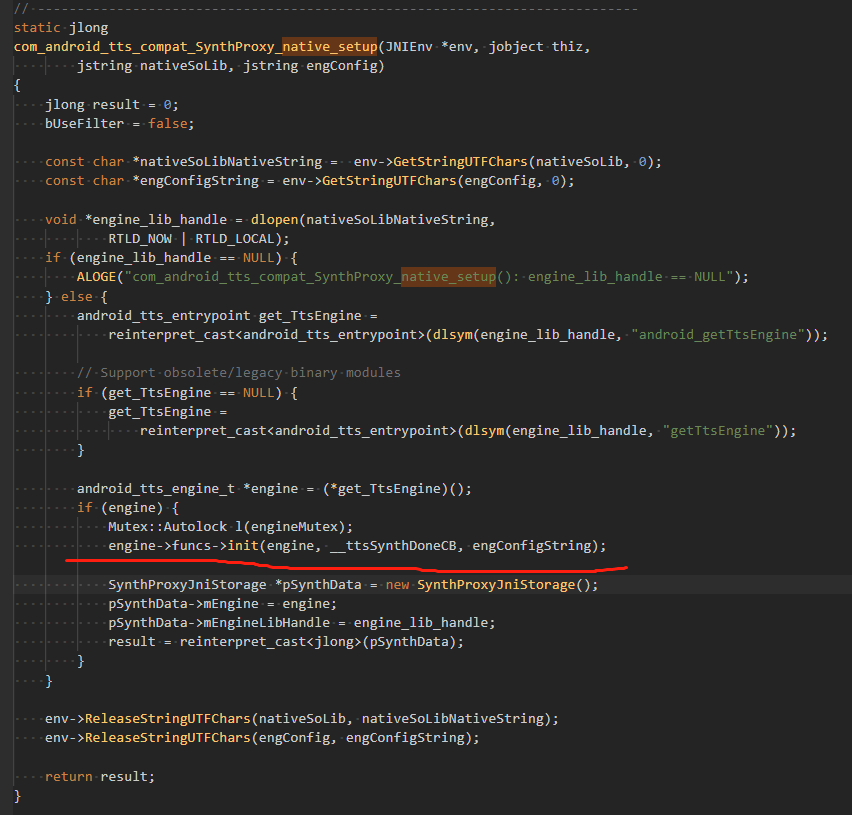
/** init
* Allocates Pico memory block and initializes the Pico system.
* synthDoneCBPtr - Pointer to callback function which will receive generated samples
* config - the engine configuration parameters, here only contains the non-system path
* for the lingware location
* return tts_result
*/
tts_result TtsEngine::init( synthDoneCB_t synthDoneCBPtr, const char *config )
{
if (synthDoneCBPtr == NULL) {
ALOGE("Callback pointer is NULL");
return TTS_FAILURE;
}

picoMemArea = malloc( PICO_MEM_SIZE );
if (!picoMemArea) {
ALOGE("Failed to allocate memory for Pico system");
return TTS_FAILURE;
}

pico_Status ret = pico_initialize( picoMemArea, PICO_MEM_SIZE, &picoSystem );
if (PICO_OK != ret) {
ALOGE("Failed to initialize Pico system");
free( picoMemArea );
picoMemArea = NULL;
return TTS_FAILURE;
}

picoSynthDoneCBPtr = synthDoneCBPtr;

picoCurrentLangIndex = -1;

// was the initialization given an alternative path for the lingware location?
if ((config != NULL) && (strlen(config) > 0)) {
pico_alt_lingware_path = (char*)malloc(strlen(config));
strcpy((char*)pico_alt_lingware_path, config);
ALOGV("Alternative lingware path %s", pico_alt_lingware_path);
} else {
pico_alt_lingware_path = (char*)malloc(strlen(PICO_LINGWARE_PATH) + 1);
strcpy((char*)pico_alt_lingware_path, PICO_LINGWARE_PATH);
ALOGV("Using predefined lingware path %s", pico_alt_lingware_path);
}

return TTS_SUCCESS;
}

到这里,TTS引擎的初始化就完成了。

再看下TTS调用的角度,一般TTS调用的类是TextToSpeech中的speak()方法,我们来看看其执行流程:

1
2
3
4
5
6
7
8
9
10
11
12
13
14
15
16
17
18
public int speak(final CharSequence text,
final int queueMode,
final Bundle params,
final String utteranceId) {
return runAction(new Action<Integer>() {
@Override
public Integer run(ITextToSpeechService service) throws RemoteException {
Uri utteranceUri = mUtterances.get(text);
if (utteranceUri != null) {
return service.playAudio(getCallerIdentity(), utteranceUri, queueMode,
getParams(params), utteranceId);
} else {
return service.speak(getCallerIdentity(), text, queueMode, getParams(params),
utteranceId);
}
}
}, ERROR, "speak");
}

主要是看runAction()方法:

1
2
3
4
5
6
7
8
9
10
11
private <R> R runAction(Action<R> action, R errorResult, String method,
boolean reconnect, boolean onlyEstablishedConnection) {
synchronized (mStartLock) {
if (mServiceConnection == null) {
Log.w(TAG, method + " failed: not bound to TTS engine");
return errorResult;
}
return mServiceConnection.runAction(action, errorResult, method, reconnect,
onlyEstablishedConnection);
}
}

主要看下mServiceConnection类的runAction方法,

1
2
3
4
5
6
7
8
9
10
11
12
13
14
15
16
17
18
19
20
21
22
23
public <R> R runAction(Action<R> action, R errorResult, String method,
boolean reconnect, boolean onlyEstablishedConnection) {
synchronized (mStartLock) {
try {
if (mService == null) {
Log.w(TAG, method + " failed: not connected to TTS engine");
return errorResult;
}
if (onlyEstablishedConnection && !isEstablished()) {
Log.w(TAG, method + " failed: TTS engine connection not fully set up");
return errorResult;
}
return action.run(mService);
} catch (RemoteException ex) {
Log.e(TAG, method + " failed", ex);
if (reconnect) {
disconnect();
initTts();
}
return errorResult;
}
}
}

可以发现最后会回调action.run(mService)方法。接着执行service.playAudio(),这里的service为PicoService,其继承于抽象类CompatTtsService,而CompatTtsService继承于抽象类TextToSpeechService。

所以会执行TextToSpeechService中的playAudio(),该方法位于TextToSpeechService中mBinder中。该方法如下:

1
2
3
4
5
6
7
8
9
10
11
@Override
public int playAudio(IBinder caller, Uri audioUri, int queueMode, Bundle params,
String utteranceId) {
if (!checkNonNull(caller, audioUri, params)) {
return TextToSpeech.ERROR;
}

SpeechItem item = new AudioSpeechItemV1(caller,
Binder.getCallingUid(), Binder.getCallingPid(), params, utteranceId, audioUri);
return mSynthHandler.enqueueSpeechItem(queueMode, item);
}

接着执行mSynthHandler.enqueueSpeechItem(queueMode, item),其代码如下:

1
2
3
4
5
6
7
8
9
10
11
12
13
14
15
16
17
18
19
20
21
22
23
24
25
26
27
28
29
30
31
32
33
34
35
36
37
38
39
40
41
42
43
44
45
46
47
48
49
50
51
52
53
54
/**
* Adds a speech item to the queue.
*
* Called on a service binder thread.
*/
public int enqueueSpeechItem(int queueMode, final SpeechItem speechItem) {
UtteranceProgressDispatcher utterenceProgress = null;
if (speechItem instanceof UtteranceProgressDispatcher) {
utterenceProgress = (UtteranceProgressDispatcher) speechItem;
}

if (!speechItem.isValid()) {
if (utterenceProgress != null) {
utterenceProgress.dispatchOnError(
TextToSpeech.ERROR_INVALID_REQUEST);
}
return TextToSpeech.ERROR;
}

if (queueMode == TextToSpeech.QUEUE_FLUSH) {
stopForApp(speechItem.getCallerIdentity());
} else if (queueMode == TextToSpeech.QUEUE_DESTROY) {
stopAll();
}
Runnable runnable = new Runnable() {
@Override
public void run() {
if (isFlushed(speechItem)) {
speechItem.stop();
} else {
setCurrentSpeechItem(speechItem);
speechItem.play();
setCurrentSpeechItem(null);
}
}
};
Message msg = Message.obtain(this, runnable);

// The obj is used to remove all callbacks from the given app in
// stopForApp(String).
//
// Note that this string is interned, so the == comparison works.
msg.obj = speechItem.getCallerIdentity();

if (sendMessage(msg)) {
return TextToSpeech.SUCCESS;
} else {
Log.w(TAG, "SynthThread has quit");
if (utterenceProgress != null) {
utterenceProgress.dispatchOnError(TextToSpeech.ERROR_SERVICE);
}
return TextToSpeech.ERROR;
}
}

主要是看 speechItem.play()方法,代码如下:

1
2
3
4
5
6
7
8
9
10
11
12
13
14
15
16
17
/**
* Plays the speech item. Blocks until playback is finished.
* Must not be called more than once.
*
* Only called on the synthesis thread.
*/
public void play() {
synchronized (this) {
if (mStarted) {
throw new IllegalStateException("play() called twice");
}
mStarted = true;
}
playImpl();
}

protected abstract void playImpl();

可以看到主要播放实现方法为playImpl(),那么在TextToSpeechService中的playAudio()中代码可以知道这里的speechitem为SynthesisSpeechItemV1。

因此在play中执行的playimpl()方法为SynthesisSpeechItemV1类中的playimpl()方法,其代码如下:

1
2
3
4
5
6
7
8
9
10
11
12
13
14
15
16
17
18
19
20
21
@Override
protected void playImpl() {
AbstractSynthesisCallback synthesisCallback;
mEventLogger.onRequestProcessingStart();
synchronized (this) {
// stop() might have been called before we enter this
// synchronized block.
if (isStopped()) {
return;
}
mSynthesisCallback = createSynthesisCallback();
synthesisCallback = mSynthesisCallback;
}

TextToSpeechService.this.onSynthesizeText(mSynthesisRequest, synthesisCallback);

// Fix for case where client called .start() & .error(), but did not called .done()
if (synthesisCallback.hasStarted() && !synthesisCallback.hasFinished()) {
synthesisCallback.done();
}
}

在playImpl方法中会执行onSynthesizeText方法,这是个抽象方法,记住其传递了一个synthesisCallback,后面会讲到。哪该方法具体实现是在哪里呢,没错,就是在TextToSpeechService的子类CompatTtsService中。来看看它怎么实现的:

1
2
3
4
5
6
7
8
9
10
11
12
13
14
15
16
17
18
19
20
21
22
23
24
25
26
27
28
29
30
31
32
33
34
35
36
37
38
39
@Override
protected void onSynthesizeText(SynthesisRequest request, SynthesisCallback callback) {
if (mNativeSynth == null) {
callback.error();
return;
}

// Set language
String lang = request.getLanguage();
String country = request.getCountry();
String variant = request.getVariant();
if (mNativeSynth.setLanguage(lang, country, variant) != TextToSpeech.SUCCESS) {
Log.e(TAG, "setLanguage(" + lang + "," + country + "," + variant + ") failed");
callback.error();
return;
}

// Set speech rate
int speechRate = request.getSpeechRate();
if (mNativeSynth.setSpeechRate(speechRate) != TextToSpeech.SUCCESS) {
Log.e(TAG, "setSpeechRate(" + speechRate + ") failed");
callback.error();
return;
}

// Set speech
int pitch = request.getPitch();
if (mNativeSynth.setPitch(pitch) != TextToSpeech.SUCCESS) {
Log.e(TAG, "setPitch(" + pitch + ") failed");
callback.error();
return;
}

// Synthesize
if (mNativeSynth.speak(request, callback) != TextToSpeech.SUCCESS) {
callback.error();
return;
}
}

最终又回到系统提供的pico引擎中,在com_android_tts_compat_SynthProxy.cpp这个文件中,可以看到使用speak方法,代码如下:

1
2
3
4
5
6
7
8
9
10
11
12
13
14
15
16
17
18
19
20
21
22
23
24
25
26
27
28
29
30
31
32
33
static jint
com_android_tts_compat_SynthProxy_speak(JNIEnv *env, jobject thiz, jlong jniData,
jstring textJavaString, jobject request)
{
SynthProxyJniStorage* pSynthData = getSynthData(jniData);
if (pSynthData == NULL) {
return ANDROID_TTS_FAILURE;
}

initializeFilter();

Mutex::Autolock l(engineMutex);

android_tts_engine_t *engine = pSynthData->mEngine;
if (!engine) {
return ANDROID_TTS_FAILURE;
}

SynthRequestData *pRequestData = new SynthRequestData;
pRequestData->jniStorage = pSynthData;
pRequestData->env = env;
pRequestData->request = env->NewGlobalRef(request);
pRequestData->startCalled = false;

const char *textNativeString = env->GetStringUTFChars(textJavaString, 0);
memset(pSynthData->mBuffer, 0, pSynthData->mBufferSize);

int result = engine->funcs->synthesizeText(engine, textNativeString,
pSynthData->mBuffer, pSynthData->mBufferSize, static_cast<void *>(pRequestData));
env->ReleaseStringUTFChars(textJavaString, textNativeString);

return (jint) result;
}

至此,TTS的调用就结束了。

TTS 优劣势

从实现原理我们可以看到Android系统原生自带了一个TTS引擎。那么在此,我们就也可以去自定义TTS引擎,只有继承ITextToSpeechService接口即可,实现里面的方法。这就为后续自定义TTS引擎埋下伏笔了,因为系统默认的TTS引擎是不支持中文,那么市场上比较好的TTS相关产品,一般是集成讯飞或者Nuance等第三方供应商。

因此,我们也可以看到TTS优劣势。

优势:接口定义完善,有着完整的API接口方法,同时支持扩展,可根据自身开发业务需求重新打造TTS引擎,并且与原生接口做兼容,可适配。

劣势:原生系统TTS引擎支持的多国语言有限,目前不支持多实例和多通道。

演进趋势

从目前来看,随着语音成为更多Iot设备的入口,那么在语音TTS合成播报方面技术会越来越成熟,特别是对于Android 系统原生相关的接口也会越来越强大。因此,对于TTS后续的发展,应该是冉冉上升。

小结

总的来说,对于一个知识点,前期通过使用文档介绍,到具体实践,然后在实践中优化进行总结,选择一个最佳的实践方案。当然不能满足“知其然而不知其所以然”,所以得去看背后的实现原理是什么。这个知识点优劣势是什么,在哪些场景比较适用,哪些场景不适用,接下来会演进趋势怎么样。通过这么一整套流程,那么对于一个知识点来说,可以算是了然于胸了。

,