前言
Fragment想必大家不陌生吧,在日常开发中,对于Fragment的使用也很频繁,现在主流的APP中,基本的架构也都是一个主页,然后每个Tab项用Fragment做布局,不同选项做切换,使用起来也方便。但是否对它有足够的认识吗,谷歌推荐用Fragment来代替Activity,但又没有明确说为什么要用Fragment来代替Activity,这里就引发争议了,那到底是要不要用,是否使用Fragment完全替换Activity真的比常规开发模式更好吗?如果要用的话,那需要了解为何要使用Fragment,Fragment是什么,它的生命周期如何,如何使用,通信又是怎样,有什么缺点吗?带着这些问题,我们一一去解读。
目录
- Fragment为何要用
- Fragment是什么
- Fragment生命周期
- Fragment怎么用
- Fragment通信
- Fragment是否很完美
- 小结
- 参考地址
Fragment为何要用
Fragment是Android 3.0 (Honeycomb)被引入的。主要目的是为了给大屏幕(如平板电脑)上更加动态和灵活的UI设计提供支持。由于平板电脑的屏幕比手机的屏幕大很多,因此可用于组合和交换的UI组件的空间更大,利用Fragment实现此类设计的时,就无需管理对视图层次结构的复杂更改。
通过将 Activity 布局分成片段,您可以在运行时修改 Activity 的外观,并在由 Activity 管理的返回栈中保留这些更改。如果仅仅只有Activity布局,那是不够的,不仅在手机上有一套布局,同时在平板上还需要设计一套布局,那样维护起来也麻烦,代码上也有一定的冗余,对于APP包的大小也有一定的压力。Fragment的优势是布局在不同设备上的适配。
比如:
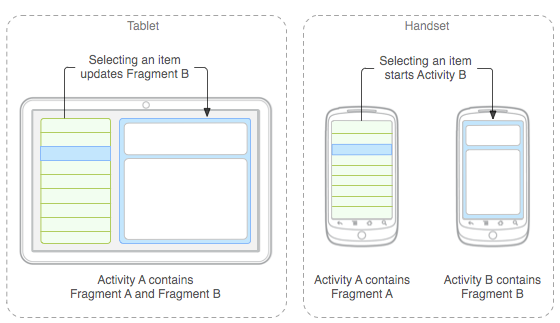
从图中我们可以看到,在平板中,一个Activity A包含了两个Fragment,分别是Fragment A和Fragment B,但在手机中呢,就需要两个Activity,分别是Activity A包含Fragment A和Activity B包含Fragment B。同时每个Fragment都具有自己的一套生命周期回调方法,并各自处理自己的用户输入事件。 因此,在平板中使用一个Activity 就可以了,左侧是列表,右边是内容详情。
除此之外,使用Fragment还有这么几个方面优势:
代码复用。特别适用于模块化的开发,因为一个Fragment可以被多个Activity嵌套,有个共同的业务模块就可以复用了,是模块化UI的良好组件。
Activity用来管理Fragment。Fragment的生命周期是寄托到Activity中,Fragment可以被Attach添加和Detach释放。
可控性。Fragment可以像普通对象那样自由的创建和控制,传递参数更加容易和方便,也不用处理系统相关的事情,显示方式、替换、不管是整体还是部分,都可以做到相应的更改。
Fragments是view controllers,它们包含可测试的,解耦的业务逻辑块,由于Fragments是构建在views之上的,而views很容易实现动画效果,因此Fragments在屏幕切换时具有更好的控制。
Fragment是什么
说了半天的Fragment,也看到这么多次Fragment这个名词出现,那么Fragment到底是什么东东呢?定义又是如何?
Fragment也可以叫为“片段”,但我觉得“片段”中文叫法有点生硬,还是保持叫Fragment比较好,它可以表示Activity中的行为或用户界面部分。我们可以在一个Activity中用多个Fragment组合来构建多窗格的UI,以及在多个Activity中重复使用某个Fragment。它有自己的生命周期,能接受自己的输入,并且可以在 Activity 运行时添加或删除Fragment(有点像在不同 Activity 中重复使用的“子 Activity”)。
简单来说,Fragment其实可以理解为一个具有自己生命周期的控件,只不过这个控件又有点特殊,它有自己的处理输入事件的能力,有自己的生命周期,又必须依赖于Activity,能互相通信和托管。
Fragment生命周期
如图:
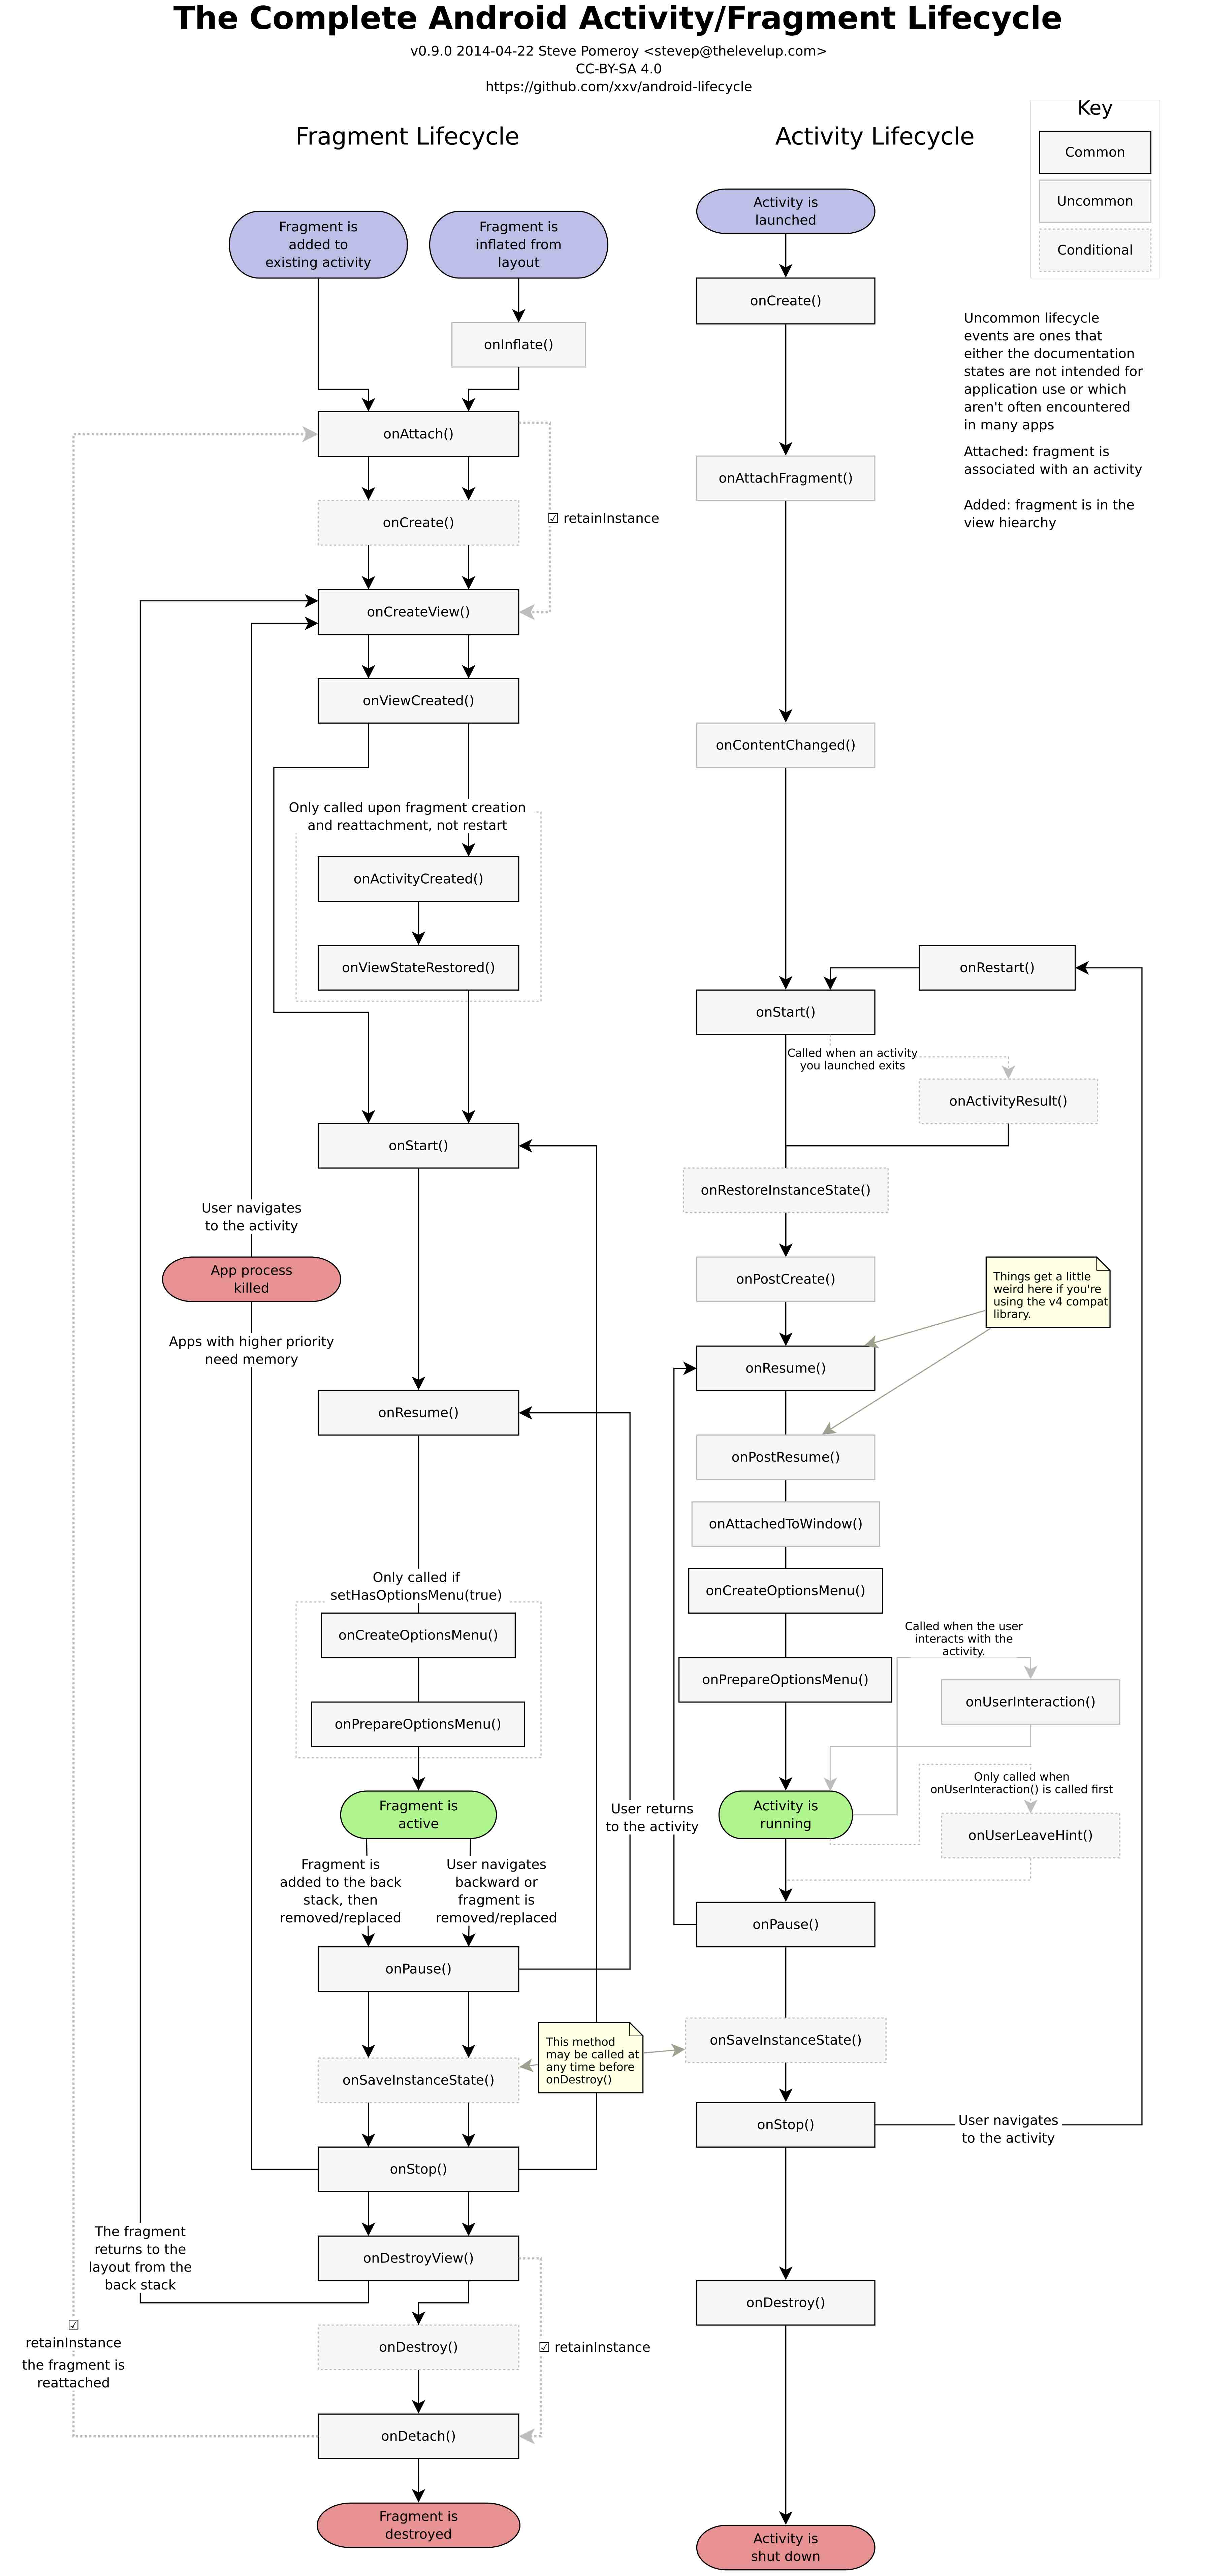
这张图是Fragment生命周期和Activity生命周期对比图,可以看到两者还是有很多相似的地方,比如都有onCreate(),onStart(),onPause(),onDestroy()等等,因为Fragment是被托管到Activity中的,所以多了两个onAttach()和onDetach()。这里讲讲与Activity生命周期不一样的方法。
onAttach()
Fragment和Activity建立关联的时候调用,被附加到Activity中去。
onCreate()
系统会在创建Fragment时调用此方法。可以初始化一段资源文件等等。
onCreateView()
系统会在Fragment首次绘制其用户界面时调用此方法。 要想为Fragment绘制 UI,从该方法中返回的 View 必须是Fragment布局的根视图。如果Fragment未提供 UI,您可以返回 null。
onViewCreated()
在Fragment被绘制后,调用此方法,可以初始化控件资源。
onActivityCreated()
当onCreate(),onCreateView(),onViewCreated()方法执行完后调用,也就是Activity被渲染绘制出来后。
onPause()
系统将此方法作为用户离开Fragment的第一个信号(但并不总是意味着此Fragment会被销毁)进行调用。 通常可以在此方法内确认在当前用户会话结束后仍然有效的任何更改(因为用户可能不会返回)。
onDestroyView()
Fragment中的布局被移除时调用。
onDetach()
Fragment和Activity解除关联的时候调用。
但需要注一点是:除了onCreateView,其他的所有方法如果你重写了,必须调用父类对于该方法的实现。
还有一般在启动Fragment的时候,它的生命周期就会执行这几个方法。

Fragment怎么用
前面介绍了半天,不耐烦的人会说,这么多废话,也不见的到底是如何使用,毕竟我们是开发者,需要的使用方式,那么现在就来说说用法如何吧。两种方式:静态用法和动态用法。
静态用法
1、继承Fragment,重写onCreateView决定Fragemnt的布局
2、在Activity中声明此Fragment,就当和普通的View一样
首先是布局文件:fragment1.xml
1 | <LinearLayout xmlns:android="http://schemas.android.com/apk/res/android" |
可以看到,这个布局文件非常简单,只有一个LinearLayout,里面加入了一个TextView。我们再新建一个fragment2.xml :
1 | <LinearLayout xmlns:android="http://schemas.android.com/apk/res/android" |
然后新建一个类Fragment1,这个类是继承自Fragment的:
1 | public class Fragment1 extends Fragment { |
可以看到,在onCreateView()方法中加载了fragment1.xml的布局。同样fragment2.xml也是一样的做法,新建一个Fragment2类:
1 | public class Fragment2 extends Fragment { |
然后打开或新建activity_main.xml作为主Activity的布局文件,在里面加入两个Fragment的引用,使用android:name前缀来引用具体的Fragment:
1 | <LinearLayout xmlns:android="http://schemas.android.com/apk/res/android" |
最后新建MainActivity作为程序的主Activity,里面的代码非常简单,都是自动生成的:
1 | public class MainActivity extends Activity { |
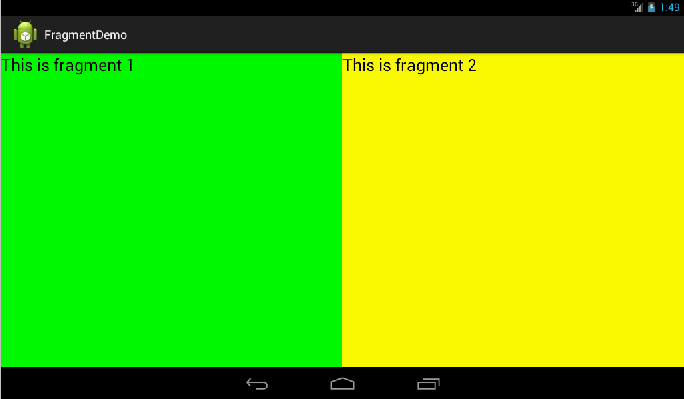
现在我们来运行一次程序,就会看到,一个Activity很融洽地包含了两个Fragment,这两个Fragment平分了整个屏幕,效果图如下:
动态用法
上面仅仅是Fragment简单用法,它真正强大部分是在动态地添加到Activity中,那么动态用法又是如何呢?
还是在静态用法代码的基础上修改,打开activity_main.xml,将其中对Fragment的引用都删除,只保留最外层的LinearLayout,并给它添加一个id,因为我们要动态添加Fragment,不用在XML里添加了,删除后代码如下:
1 | <LinearLayout xmlns:android="http://schemas.android.com/apk/res/android" |
然后打开MainActivity,修改其中的代码如下所示:
1 | public class MainActivity extends Activity { |
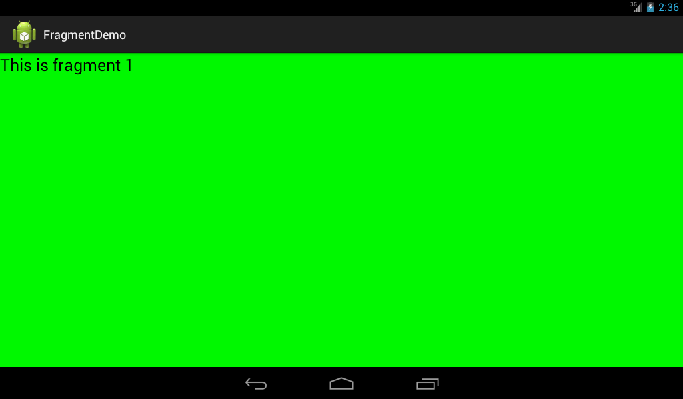
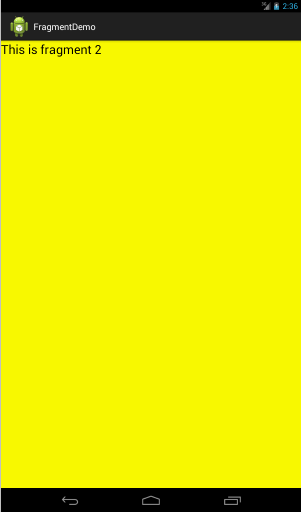
看到了没,首先,我们要获取屏幕的宽度和高度,然后进行判断,如果屏幕宽度大于高度就添加fragment1,如果高度大于宽度就添加fragment2。动态添加Fragment主要分为4步:
1.获取到FragmentManager,在Activity中可以直接通过getFragmentManager得到。
2.开启一个事务,通过调用beginTransaction方法开启。
3.向容器内加入Fragment,一般使用replace方法实现,需要传入容器的id和Fragment的实例。
4.提交事务,调用commit方法提交。
现在运行一下程序,效果如下图所示:
要想管理 Activity 中的片段,需要使用 FragmentManager。要想获取它,需要 Activity 调用 getFragmentManager()。
使用 FragmentManager 执行的操作包括:
- 通过 findFragmentById()(对于在 Activity 布局中提供 UI 的片段)或 findFragmentByTag()(对于提供或不提供 UI 的片段)获取 Activity 中存在的片段
- 通过 popBackStack()将片段从返回栈中弹出
- 通过 addOnBackStackChangedListener() 注册一个侦听返回栈变化的侦听器
也可以使用 FragmentManager 打开一个 FragmentTransaction,通过它来执行某些事务,如添加和删除片段。
Fragment通信
尽管 Fragment 是作为独立于 Activity的对象实现,并且可在多个 Activity 内使用,但Fragment 的给定实例会直接绑定到包含它的 Activity。具体地说,Fragment 可以通过 getActivity() 访问 Activity实例,并轻松地执行在 Activity 布局中查找视图等任务。如:
1 | View listView = getActivity().findViewById(R.id.list); |
同样地,Activity 也可以使用 findFragmentById() 或 findFragmentByTag(),通过从 FragmentManager 获取对 Fragment 的引用来调用Fragment中的方法。例如:
1 | ExampleFragment fragment = (ExampleFragment) getFragmentManager().findFragmentById(R.id.example_fragment); |
创建对 Activity 的事件回调
在某些情况下,可能需要通过与 Activity 共享事件。执行此操作的一个好方法是,在Fragment 内定义一个回调接口,并要求宿主 Activity 实现它。 当 Activity 通过该接口收到回调时,可以根据需要与布局中的其他Fragment共享这些信息。
例如,如果一个新闻应用的 Activity 有两个Fragment ,一个用于显示文章列表(Fragment A),另一个用于显示文章(Fragment B)—,那么Fragment A必须在列表项被选定后告知 Activity,以便它告知Fragment B 显示该文章。 在本例中,OnArticleSelectedListener 接口在片段 A 内声明:
1 | public static class FragmentA extends ListFragment { |
然后,该Fragment的宿主 Activity 会实现 OnArticleSelectedListener 接口并替代 onArticleSelected(),将来自Fragment A 的事件通知Fragment B。为确保宿主 Activity 实现此界面,Fragment A 的 onAttach() 回调方法(系统在向 Activity 添加Fragment时调用的方法)会通过转换传递到 onAttach() 中的 Activity 来实例化 OnArticleSelectedListener 的实例:
1 | public static class FragmentA extends ListFragment { |
如果 Activity 未实现界面,则片段会引发 ClassCastException。实现时,mListener 成员会保留对 Activity 的 OnArticleSelectedListener 实现的引用,以便Fragment A 可以通过调用 OnArticleSelectedListener 界面定义的方法与 Activity 共享事件。例如,如果Fragment A 是 ListFragment 的一个扩展,则用户每次点击列表项时,系统都会调用Fragment中的 onListItemClick(),然后该方法会调用 onArticleSelected() 以与 Activity 共享事件:
1 | public static class FragmentA extends ListFragment { |
Fragment是否很完美
因为Fragment是由FragmentManager来管理,每一个Activity有一个FragmentManager,管理着一个Fragment的栈,Activity是系统级别的,由系统来管理ActivityManager,栈也是系统范围的。而Fragment则是每个Activity范围内的,所以在使用Fragment的时候也有几点要注意。
同一个Activity中,只能有一个ID或TAG标识的Fragment实例。
这很容易理解,同一个范围内,有标识的实例肯定是要唯一才行(否则还要标识干嘛)这个在布局中经常犯错,在布局中写Fragment最好不要加ID或者TAG,否则很容易出现不允许创建的错误。我的原则是如果放在布局中,就不要加ID和TAG,如果需要ID和TAG就全用代码控制。创建新实例前先到FragmentManager中查找一番,这也正是有标识的意义所在。
一个Activity中有一个Fragment池,实例不一定会被销毁,可能会保存在池中。
这个跟第一点差不多。就好比系统会缓存Activity的实例一样,FragmentManager也会缓存Fragment实例,以方便和加速再次显示。
FragmentManager的作用范围是整个Activity,所以,某一个布局ID,不能重复被Fragment替换。
通常显示Fragment有二种方式,一种是层叠到某个布局上,或者把某个布局上面的Fragment替换掉,但是这个布局不能出现二次,比如布局A中有ID为id的区域,要显示为Fragment,此布局A,只能在一个Activity中显示一个,否则第二个id区域不能被Fragment成功替换。因为虽有二个ID布局的实例,但ID是相同的,对FragmentManager来说是一样的,它会认为只有一个,因为它看的是布局的ID,而不是布局的实例。
Fragment的生命周期反应Activity的生命周期。
Fragment在显示和退出时会走一遍完整的生命周期。此外,正在显示时,就跟Activity的一样,Activity被onPause,里面的Fragment就onPause,以此类推,由此带来的问题就是,比如你在onStart()里面做了一些事情,那么,当宿主Activity被挡住,又出现时(比如接了个电话),Fragment的onStart也会被高到,所以你要想到,这些生命周期不单单在显示和退出时会走到。
Fragment的对用户可见性。
这个问题出现在有Fragment栈的时候,也就是说每个Fragment不知道自己是否真的对用户可见。比如现在是Fragment A,又在其上面显示了Fragment B,当B显示后,A并不知道自己上面还有一个,也不知道自己对用户不可见了,同样再有一个C,B也不知。C退出后,B依然不知自己已在栈顶,对用户可见,B退后,A也不知。也就是说Fragment显示或者退出,栈里的其他Fragment无法感知。这点就不如Activity,a被b盖住后,a会走到onStop(),同样c显示后,b也能通过onStop()感知。Fragment可以从FragmentManager监听BackStackState的变化,但它只告诉你Stack变了,不告诉你是多了,还是少,还有你处的位置。有一个解决方案就是,记录页面的Path深度,再跟Fragment所在的Stack深度来比较,如果一致,那么这个Fragment就在栈顶。因为每个页面的Path深度是固定的,而Stack深度是不变化的,所以这个能准确的判断Fragment是否对用户可见,当然,这个仅针对整个页面有效,对于布局中的一个区域是无效的。
Fragment的事件传递。
对于层叠的Fragment,其实就相当于在一个FrameLayout里面加上一堆的View,所以,如果处于顶层的Fragment没处理点击事件,那么事件就会向下层传递,直到事件被处理。比如有二个Fragment A和B,B在A上面,B只有一个简单的TextView且没处理事件,那么点击B时,会发现A里的View处理了事件。这个对于Activity也不会发生,因为事件不能跨窗体传播,上面的Activity没处理事件,也不会传给下面的Activity,即使它可见。解决之法,就是让上面的Fragment的根布局吃掉事件,为每个根ViewGroup添加onClick=“true”。
与第三方Activity交互。与第三方交互,仍要采用Android的标准startActivityForResult()和onActivityResult()这二个方法来进行。但对于Fragment有些事情需要注意,Fragment也有这二个方法,但是为了能正确的让Fragment收到onActivityResult(),需要:
- 宿主Activity要实现一个空的onActivityResult(),里面调用super.onActivityResult()
- 调用Fragment#startActivityForResult()而不是用Activity的 当然,也可以直接使用Activity的startActivityForResult(),那样的话,就只能在宿主Activity里处理返回的结果了。
小结
在用法的代码部分参考郭神的博客,感觉郭神在代码讲解部分通俗易懂,看起来也方便。总之,在使用Fragment也有一些注意事项,不是那么完美的,虽然谷歌推荐我们用Fragment来代替Activity来使用,我们也确实这做了,现在基本主流的APP也都是少量Activity+很多Fragment,但也需要避免有些坑慎入。
参考地址
1,https://developer.android.com/guide/components/fragments.html
2,http://blog.csdn.net/guolin_blog/article/details/8881711
3,http://toughcoder.net/blog/2014/10/22/effective-android-ui-architecture